Creating a FitBitAssistantBot using Microsoft Bot Framework and FitBit Web Api : Real Life Example of Authentication Using Azure Bot Service
Time to Read: 14 minutes
Introduction
Any business which transacts online requires providing some kind of chat support for the issues related to their business. This can be done by developing chat applications where the consumers directly chat with the agent of the business who then solve their problems. A new alternative to answering frequently asked questions is the use of the Chat Bot which is intelligent enough to understand the questions raised by the user and determine the solutions to them on the real-time basis. Or in case of an administrator, if they are managing a lot of operative tasks or a lot of source code bases, then an intelligent bot is of great help. In case of personal assistants, the chat bots can be used to set up reminders, book appointments, tickets, or to get reports for the user.
Scenario
In this article we will see how to develop a personal assistant chat bot which is integrated with the FitBit and can query and modify the Fitness data stored by FitBit. FitBit is a company which manufactures the Fitness Tracker bands which are used by people around the globe to track their daily fitness level We will see how to set up the authentication to the FitBit web API and integrate it with the chat bot to get a seamless performance. We will use the Microsoft Bot Framework v 4.0.8 which works with ASP.NET core 2.0 and higher. This framework makes development really fun and interesting as it provides multiple out of the box ways to develop the chat bot.
Tools and Frameworks Used
We will need following tools and frameworks installed on the development machine
- Visual Studio 2017 (Community Edition: Download Visual Studio 2017 )
- ASP.NET core 2.0 or higher (Download Link: .Net Core Download)
- Bot Emulator (Download Link: Bot Emulator Download Link)
- NodePackage Manager (Download Link: Install Node JS)
Basic Concepts
In case of bots, as stated earlier the conversation is the medium through which the user interacts with the application(the bot). So in case of the bot what ever happens we call that an activity, so an action basically is an activity. When the user replies
or asks a question, they are sending a message to the bot hence it becomes an activity and it is called message activity. This is the basic activity around which most of the logic is written. There are the other handful of activities which monitor when another
party joins the conversation, leaves it or if there is any update to the conversation.
When bot gets a message and replies to it, that constitutes a complete cycle when the conversations is initiated either way. This is called a Turn. Now a bot can collect information from user in various way
- Asking user questions
- Giving a form to user to fill out.
- Sending out visual cards to make the user select the options
The first is achieved using a dialog and the later is done using form flow and rich cards. Here we will implement the conversation using the rich cards which are sent as attachments by the bot.
What are Rich Cards?
Whenever a message is exchanged between user and the bot, it is done as Activity. The activity object has Attachments property which can be use to send out the rich cards. These rich cards are rendered as a list or carousel to the user based upon the type of the rich card used.
Following are different cards that are available to us to be used in our bots.
- Adaptive Cards : These are customizable cards which can contain images, text, buttons and speech.
- Animation Card : Cards that can play GIFs and short videos
- Audio Card: Cards which can play the audio
- Hero Card: A card that contains a single large image and buttons and text.
- Thumbnail Card: A card which contains a single thumbnail and buttons and text
- Receipt Card: Card which can be used to provide receipt to the user
- SignIn Card: Card which sends the user the card to sign in. The click action can be customized to redirect user to a new sign in page
- Video Card: A card that plays video.
Based upon our requirement we can use any of these cards to make the user experience more beautiful. More can be read about the rich cards at Rich Cards
Authentication in Bot
In our scenario we are going to consume the FitBit web API to get the fitness data for the user from the FitBit servers. FitBit web api implements OAuth 2.0 security protocol. In order to use the FitBit api we need to create an application on the FitBit portal (discussed in detail in implementation section) and then implement the Implicit Grant flow(Refer See Also section). In Bot Framework SDKs earlier than v4, the developers had to implement the OAuth Controllers, Login Links and also had to make up arrangement to store the client ids, secrets and also the management of token. But starting v4, it has become very easy to implement the Oauth authentication in the bot. Following are the steps that we have to implement to get the Oauth working.
- We need to create a OAuth Setting on our Bot Channels Registration and add the details like Client Secret, Application Id and Scopes in this setting.
- Add the OAuthSetting name in the OAuthPrompt in the code.
So for every call that is made to the API, the Azure Bot Service First Checks if the token is valid, if it is not valid then the Bot Service forces the user to provide the log in credentials to reestablish a secure connection to the api.
Design Principle
In this article, we are not going to impart intelligence to our bot. Our bot will do only function of querying and displaying the FitBit data to the user. Our use case is simple, hence our design should also be simple. One point that we need to consider is that since the bot relies on conversation to gather data, it is a real possibility that the user might try to lead the bot astray by asking random questions that are out of the scope of the bot. If that happens then the bot will start to behave stupidly and will not be able to resolve the queries of the user. This results into a poor user experience, which will in inadvertently led to the user getting fed up with the bot and they will not come back to use the bot services. So the principle for our design is simple “We will greet the user and tell them what the bot can do. If the user tries to request any other option we will politely redirect them to what we can do”
Implementation
We will discuss the implementation of the bot using following two categories
- Development
- Deployment
Development
Creating FitBit Application
FitBit application can be created using the FitBit Development portal at Create a new FitBit application. Fill out the details as shown in the sample below.
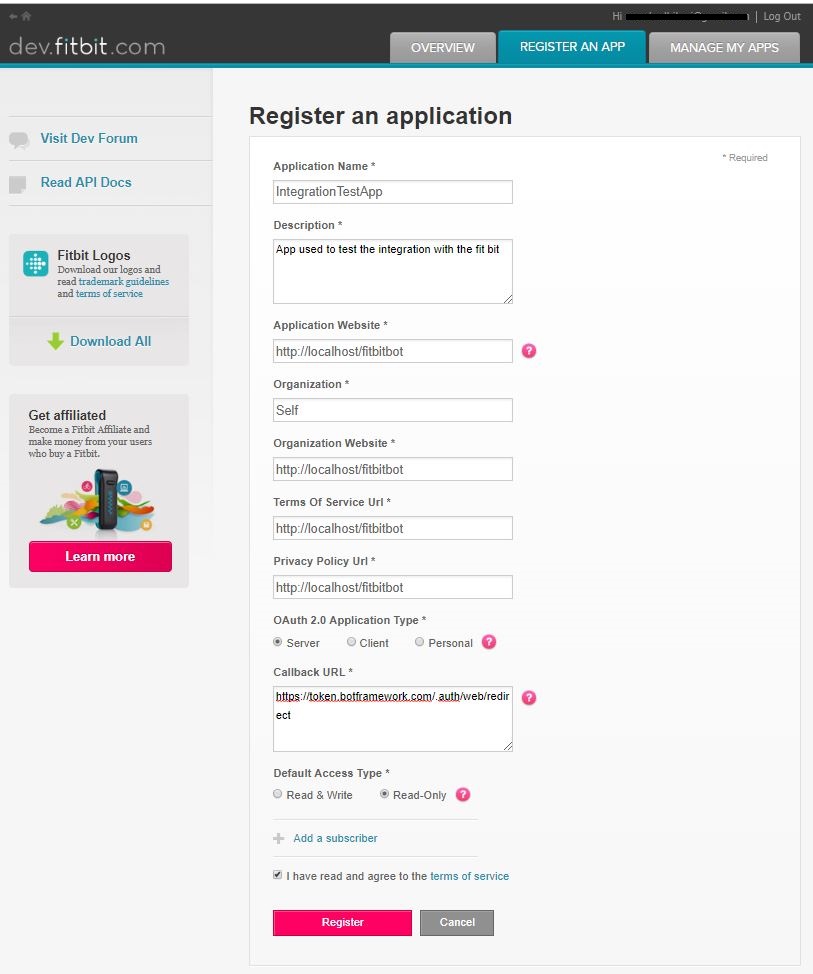
It is important to note that the CallBack URL needs to be “https://token.botframework.com/.auth/web/redirect” always for the Azure Bot Service to pickup the token. Once we click on Register, we will get the Client Id, App Id and the other details. Make a note of the Client ID and the Client Secret, we will need it later on during our deployment time.
FitBit Web API
Fit Bit Web API documentation is available extensively at the FitBit dev portal at FitBit Web Api In this article we will set up two functionalities in the bot viz. Get My Profile and My Badges
Bot
We will explore the Bot Code in this section.
Create the Bot project using the EchoBot template in visual Studio 2017. Once the project is finished the solution will look something like below.
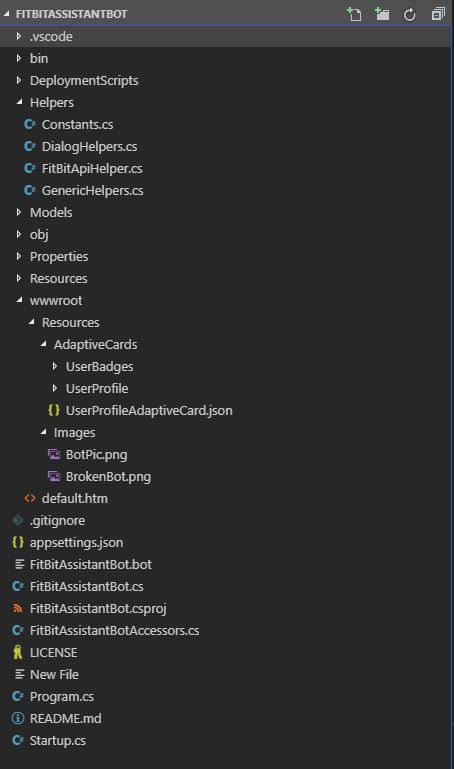
Let us explore each class is detail.
Constant.cs
I like to store the constant values in a separate constants class. The important entries in the constants class that we will use again and again are
https://gist.github.com/mandardhikari/e0a32ffd0e491c62c01c41065dc1cfe9
GenericHelper.cs
This class contains all the generic methods that can be reused across the code.
https://gist.github.com/mandardhikari/d8d5f69f904ef01d9cd000b191fa8e2d
FitBitApiHelper.cs
This is a wrapper class that is used to call the FitBit Web API. This class has a constructor which accepts the token extracted from the Azure Bot Service, This token is then added as Authorization header in each request made to the FitBit Web API. The class looks like following.
https://gist.github.com/mandardhikari/ab830ba0b3538400e2c7e7667231f06a
DialogHelpers.cs
This class contains all the methods used during the management of the conversation of the bot. It contains methods to create the Rich Cards like the welcome card, the HelpCard, the Adaptive Cards, OAuth Prompt etc.
Welcome Card
Following code snippet creates a welcome user hero card which the bot will send to the user to welcome them. It will contain the links for Login, MyProfile, MyBadges, Help and Log Out. If the user is not authenticated at a particular point, the bot will redirect the user to the OAuth prompt to login using the FitBit credentials.
https://gist.github.com/mandardhikari/d8fe70cf79ed89e506484a93d438308b
Functions Card
This card details all the function that the bot can perform.We will send this card as attachment after each successful task so that user can perform other task.
https://gist.github.com/mandardhikari/c28ea8534fc358d3b98457a0c2f8e062
Helper Card
This card list all the operations and the log out option for the user.
https://gist.github.com/mandardhikari/c4cdfcedb1eb283f6c4d6883c28e980a
Error Card
We will send this card whenever the bot encounters any unhandled exception. It will request the user to close the chat and try again.
https://gist.github.com/mandardhikari/a5c0c59305a112ab767d53eb375a9037
UserProfileAdaptiveCard
This card is sent as an adaptive card to display the user profile. This method modifies the Adaptive card generated for the user profile. It looks like below
https://gist.github.com/mandardhikari/d715d153315f92960b4fd21ea0a3514c
User Badges Adaptive Card
This is an adaptive card which is used to display the badges earned by the user. Following is the method used to parse the User Badge Details received from FitBit to the adaptive card.
https://gist.github.com/mandardhikari/f58d8c2b754cd2835dc55f010fbf7476
OAuthPrompt
This prompt is used to send out the OAuth card for the User to LogIn to the FitBit Portal so that the Bot can query the data from the FitBit API The Card will be presented each time the Azure Bot Service determines that is does not have a valid token to call the FitBit web API. The connectionName is the name of the OAuth connection that we will create when we deploy the bot. We can configure the name now and we will use the same name while deploying the bot.
https://gist.github.com/mandardhikari/a5ac70e6d22105b0d71b9c7e67c82a71
Send Welcome Message
The bot will use this task to send the welcome message to the user when they are added to the conversation. This creates and sends activity which has the welcome hero card attached to it.
https://gist.github.com/mandardhikari/6fadcf19d12e77fcb3e275d5f317dbf7
Send Error Message
This task will be used by the bot to send an activity which contains the error hero card attached to it.
https://gist.github.com/mandardhikari/c60d35b7bb22af0eb216716e1303ffce
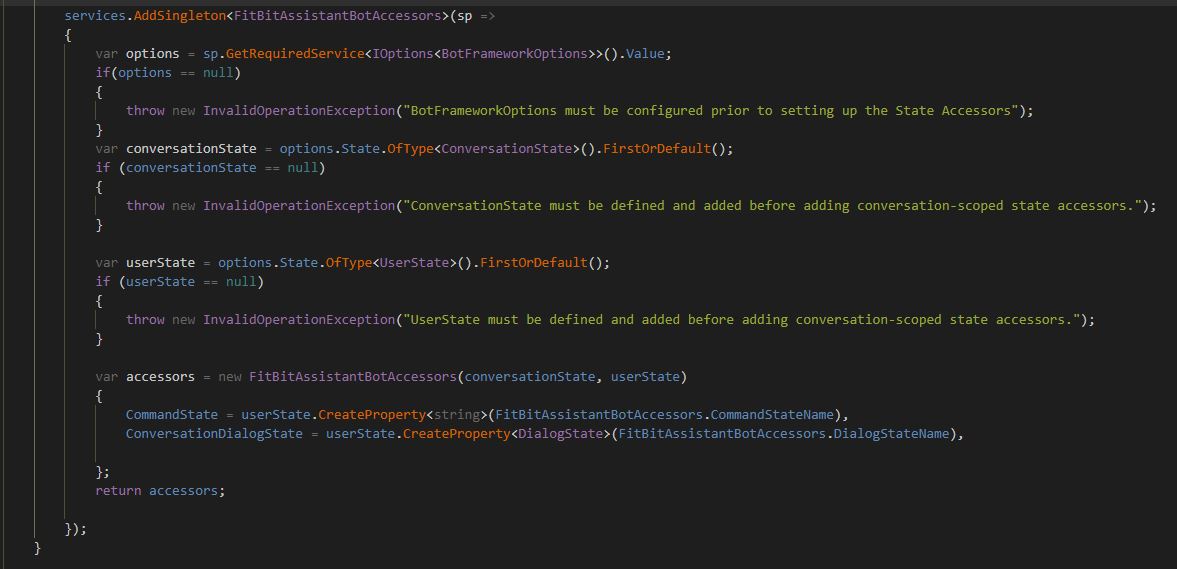
FitBitAssistantBotAccessors.cs
This class defines the properties that we want to save in the store of the bot so that they can be utilized across the calls in a particular session. This class is inserted as a singleton during the startup of the bot. The class is as follows
https://gist.github.com/mandardhikari/e83ef6e1709a557746a1fe575c13cc01
FitBitAssistantBot.cs
This is one of the most important classes of the entire bot. This class implements the IBot interface and determines the action that should be taken based upon certain inputs. The constructor for this class initialize the necessary dialogs and then the OnTurnAsync method processes the activity received/sent on each of the turn. Let us take a look at this class in-depth now.
Constructor
The constructor of the class accepts the Bot Accessor object which if fed to it at the startup. This accessor object contains the state of the User, Command and the conversation which determines what action needs to be taken in the OnTurnAsync method. The constructor also initialize the dialogset which must contain the names of all the dialogs that will be used in the process. If any dialog name is missing from the dialogset and we try perform any activity on the dialogset, in such case we will get an exception.
https://gist.github.com/mandardhikari/074693a0aaf0e72363ee22e56c7e211f
ProcessInputAsync
This method is used to process the input that the user sends to the bot. this method contains a switch case statement which will take different actions based upon the command that is received.
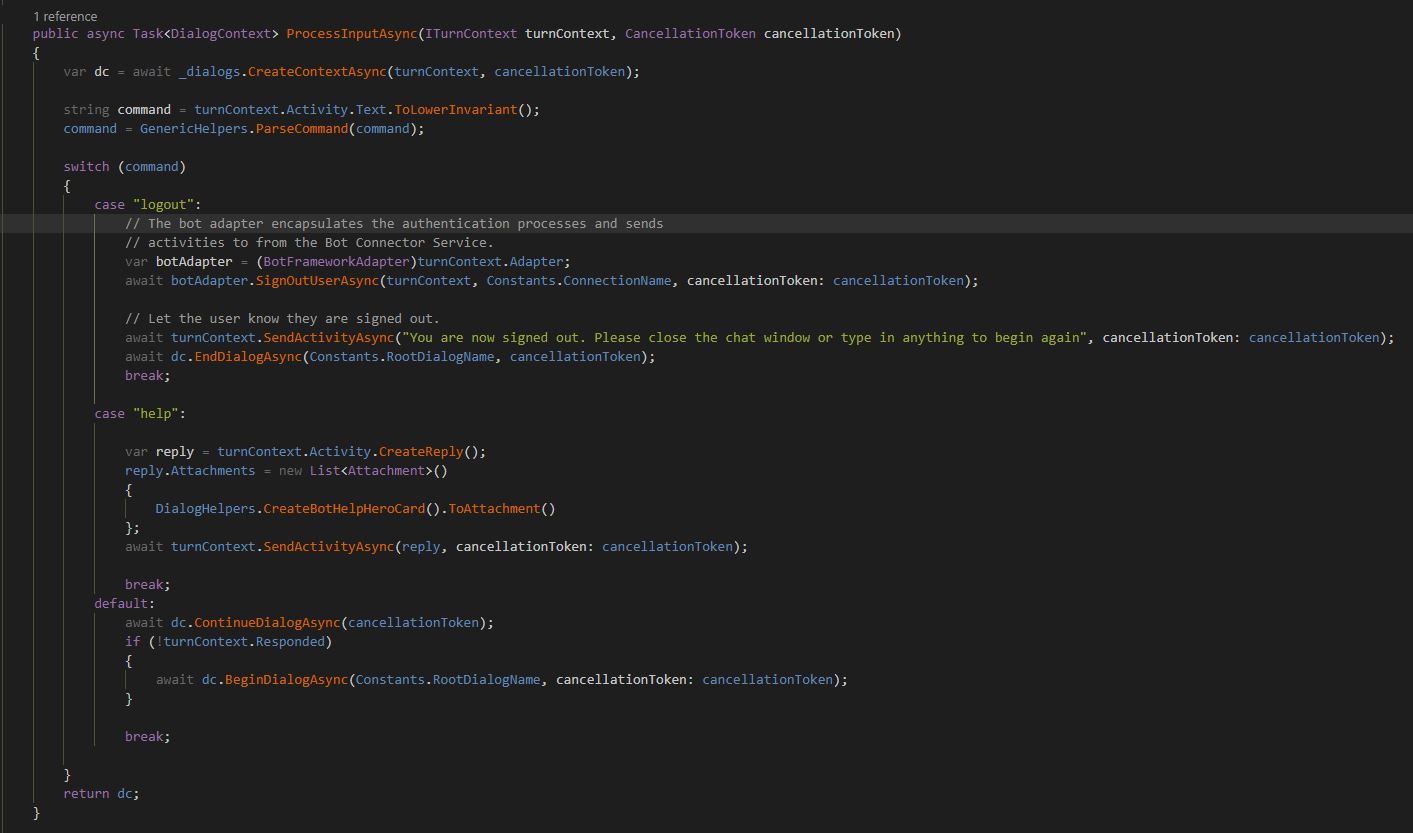
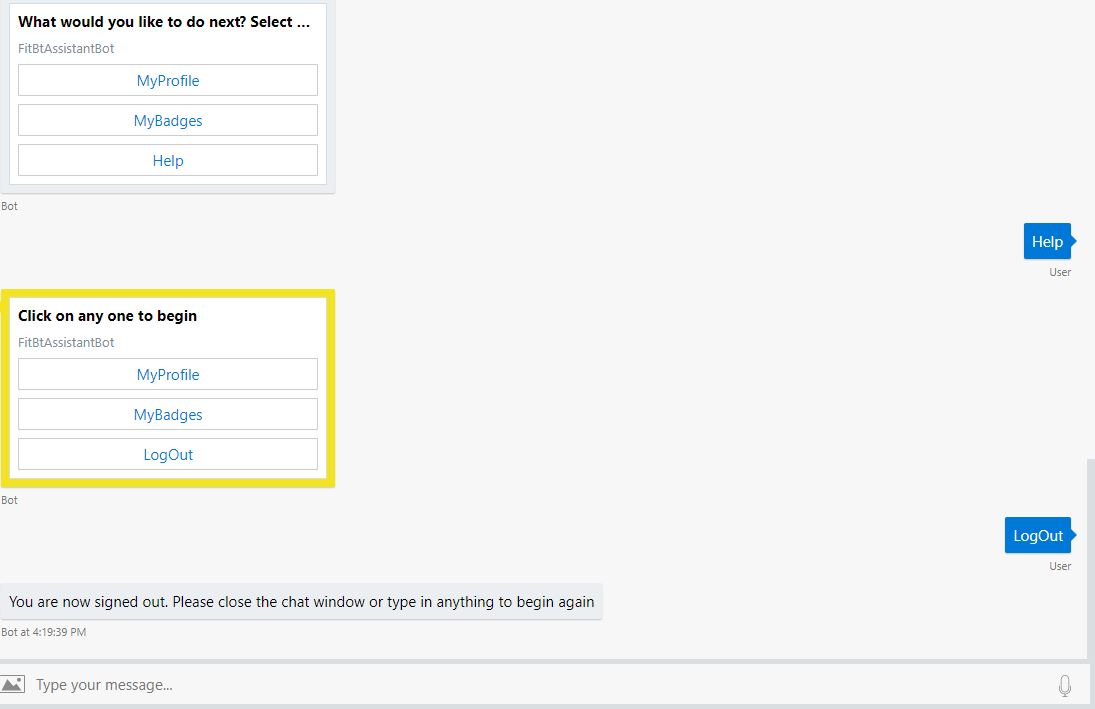
If the user sends the logout command, the bot will get the BotFrameworkAdapter object from the particular turn context and then invoke the SignOutUserAsync method to sign out the user. This will also notify the Azure Bot Service to cancel the current OAuth token stored after granting the Consent to the FitBit web API. Once the user is sign out we send back a response activity requesting the user to close the chat session or to type in anything to log in again.
In case the user sends out the help command, then we send out a response activity with the help hero card that we created earlier as an attachment.
In default case, we will create a new dialog where the user will first log in and then based upon the command will present them the options.
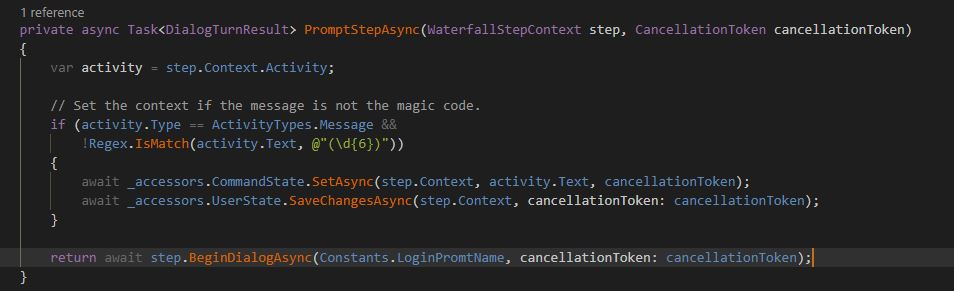
WaterFall Steps
The default clause in the OnTurnAsync method will invoke a waterfall dialog which is defined as
_dialogs.Add(newWaterfallDialog(Constants.RootDialogName, newWaterfallStep[] { PromptStepAsync, ProcessStepAsync }));PromptStepAsync
This method sets the context of the message and initiates the OAuth Prompt that we have seen before.
Process Step Async
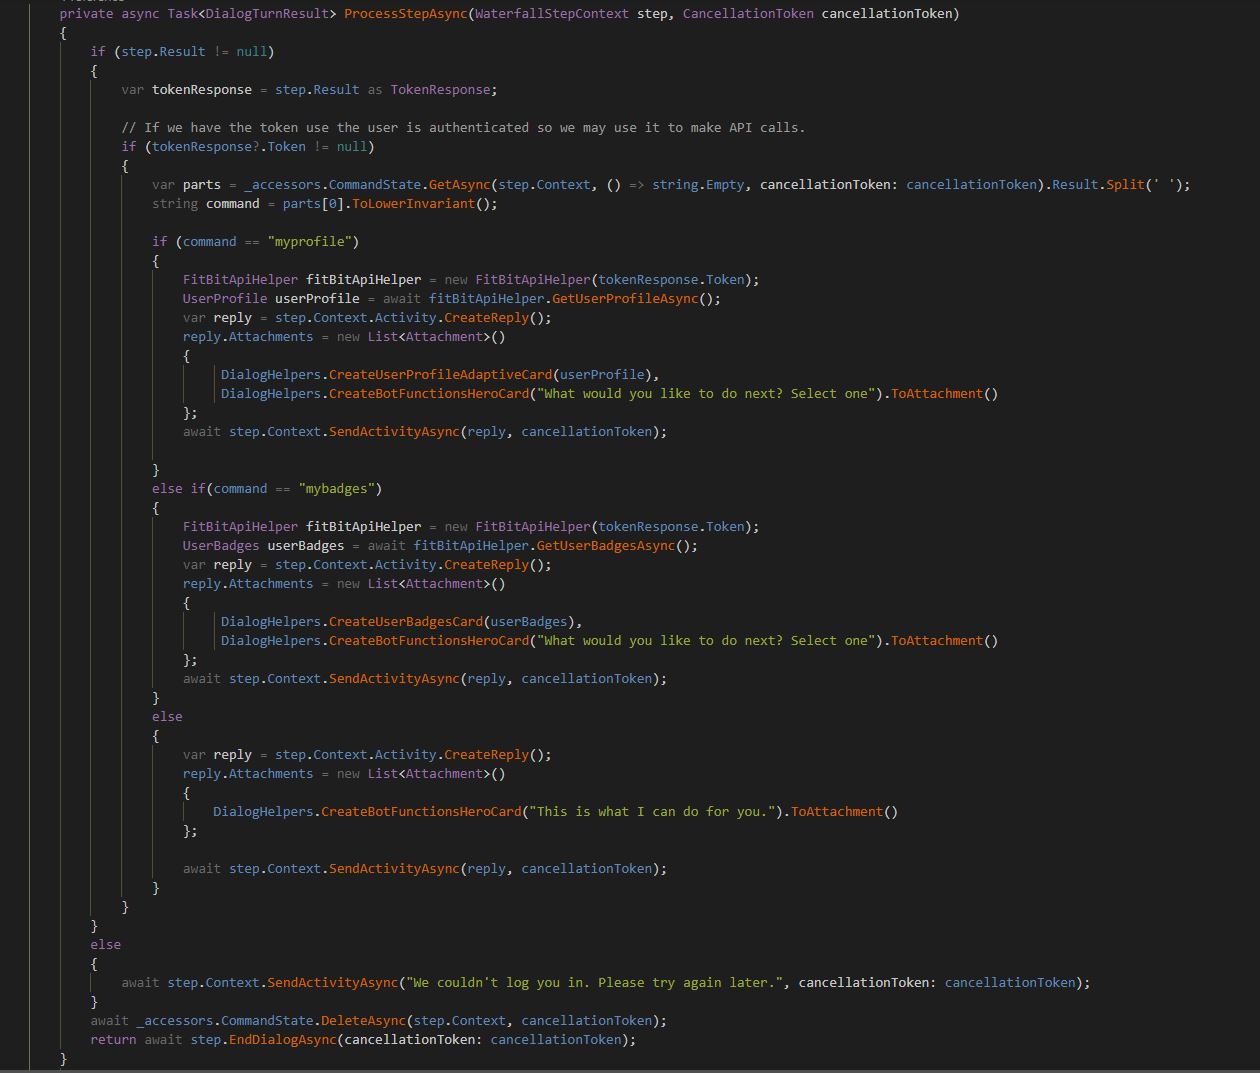
This step checks if the token that we have after providing the consent to the FitBit web API is valid or not. If the Token is not valid, the user is presented with the OAuthPrompt which will prompt the user to login. If the token is valid, then we parse the command state to get the command that bot received and invoke the respective function from the FitBitApi Helper class that we created earlier. In case the command is not handled in the if else statement, the final else sends out the function card to user to inform them of what functions the bot can handle.
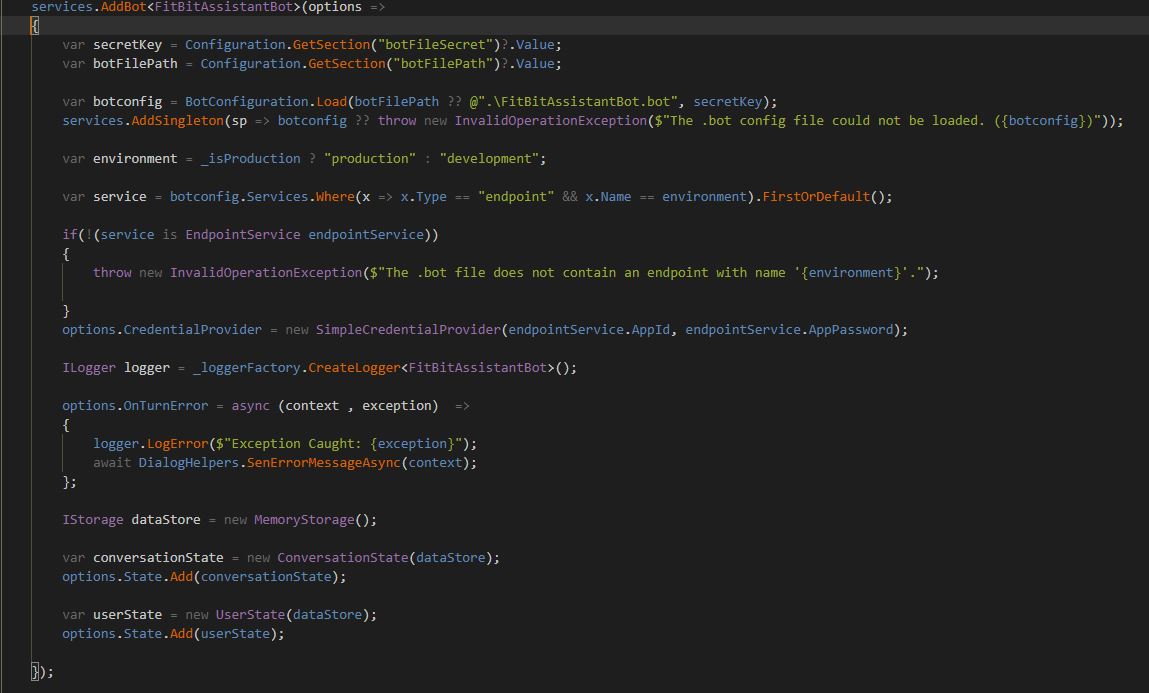
Startup.cs
This is second most important class in the bot. We define all the dependency injections here so that all the classes in code can use them as and when they require. Let us take a look at the configuration of the Startup.cs
Constructor
Here we define which configurations should be loaded at the runtime.

ConfigureServices
Here we define all the dependency injections. We will add the bot and the bot accessors to the service here.
Configure
Here we force the application to use the default files, to render the static files and to use the bot framework.

This completes the development part of the bot. We will now see what we need to do to deploy the bot to azure.
Deployment
Creating Bot Channels Registration
Head to the Azure portal and search for the Bot Channels Registration as shown below and fill out the details.
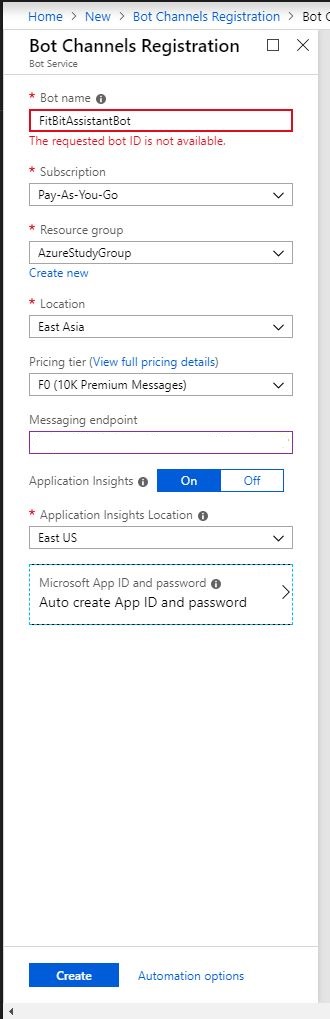
Since I have deployed the bot already, the name is taken up. In the end point provide the name of the website that we want the bot to be published as the azure app service.
For example https://fitbitbot2018.azurewebsites.net/api/messages .
Note: It is very important to add the /api/messages at the end.
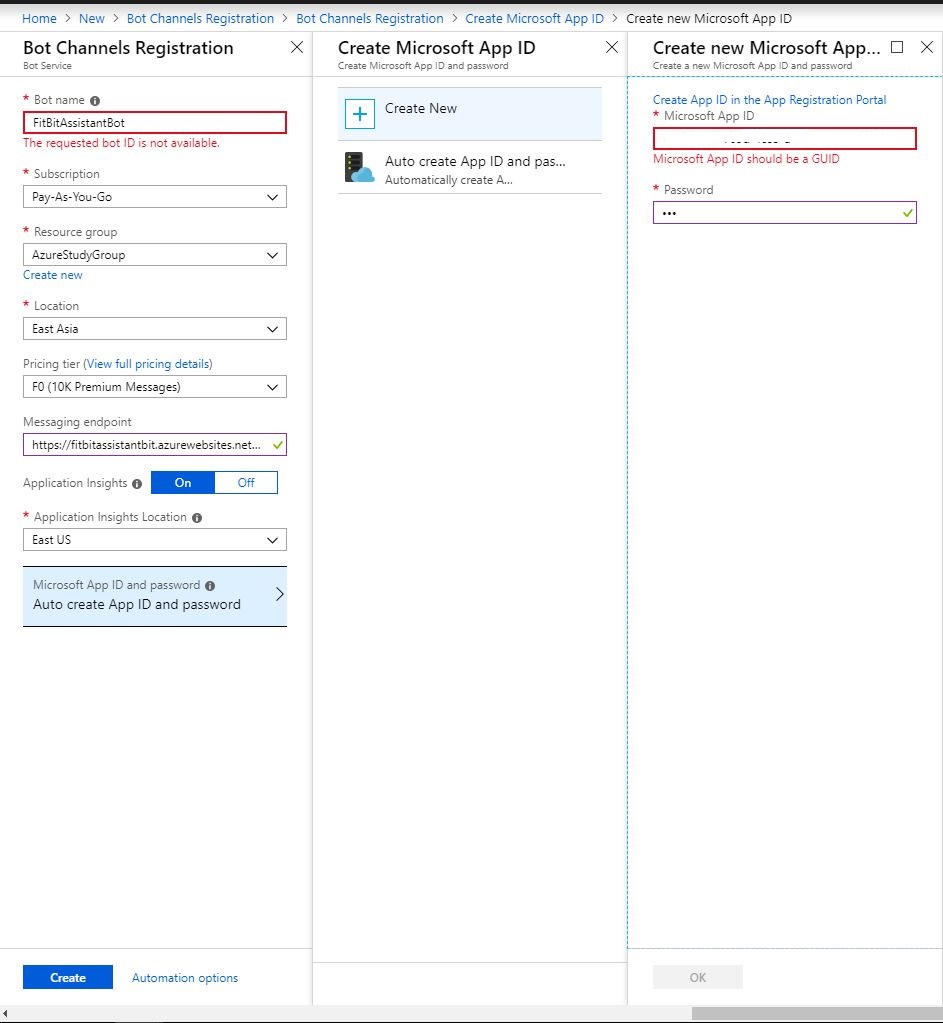
Click on Microsoft AppID and password and Click on Create New and then click on
Create App ID in the App Registration Portal.
You will be redirected to the app registrations portal. Create and note down the App ID and the password there and then come back to Azure Portal and paste the App ID and the password as shown below. The final blade should look like below. Click on Create to create the bot channels registration.
Once the Bot Channels Registration is created, let us go to the resource.
Now we add the OAuth Connection Setting for the FitBit API
Click on the setting and click on Add Setting under OAuth Connection Setting
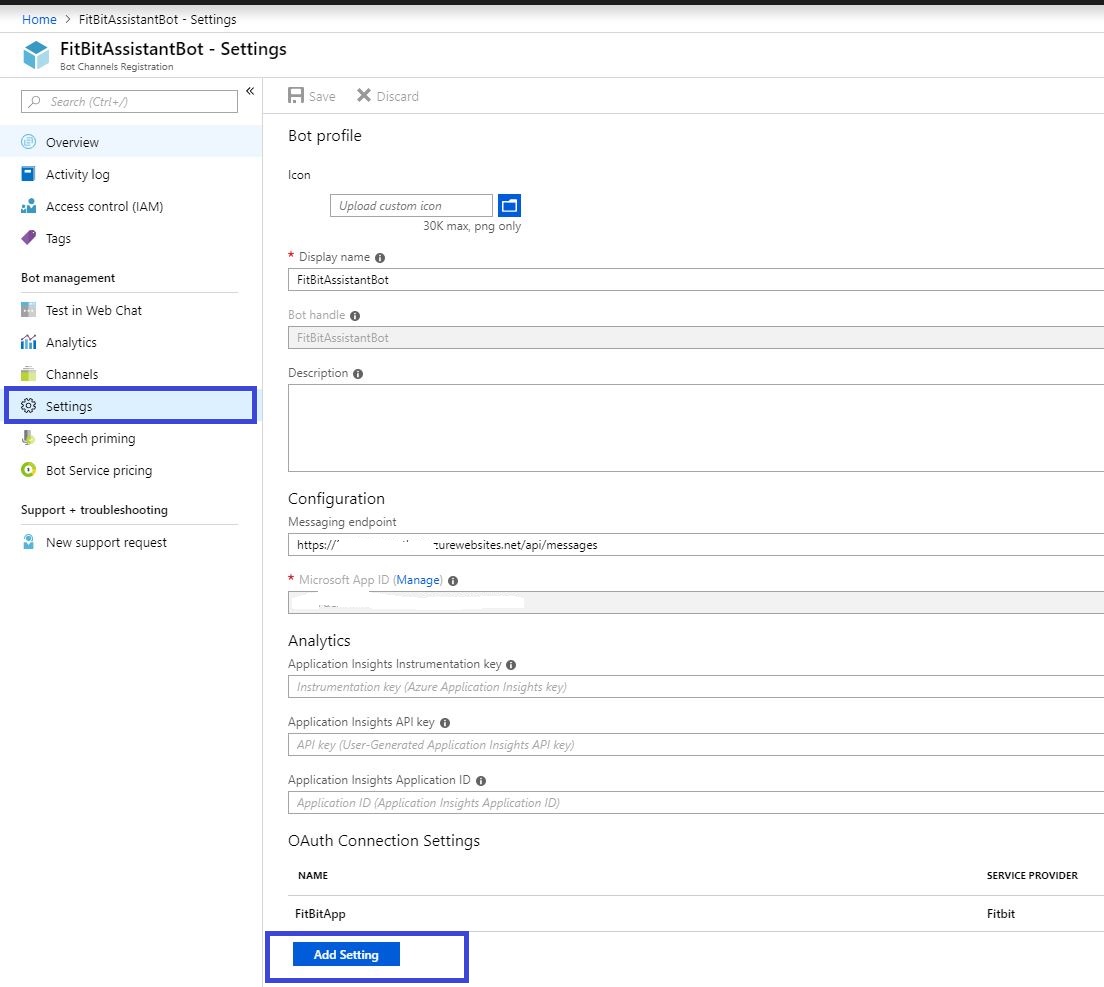
Provide the connection name (We will provide the same name that we used in the Constants.cs file in our code). Keep the Client Id and Secret handy as we need to configure it here.
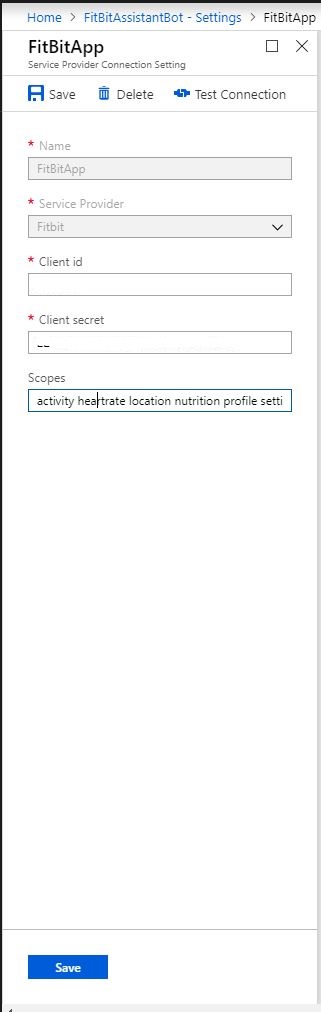
Click on Save and that is it!! OAuth implemented!!
Encrypting the Bot
In order to use our bot from the azure portal we will have to encrypt our bot. In order to encrypt our bot, we need to install the node package manager and then install the Bot command line tools. The detailed steps are provided in the requirements section.
When we created the project using the Echo bot template, it created a BotConfiguration.bo file. Starting version 4 of Bot Framework, this file is used to store the applicationId, password and endpoints for various environments. Let us take a look at the sample file generated by the Echo Bot template.
{"name": "MyEchoBot","services": [{"type": "endpoint","name": "development","endpoint": "http://localhost:3978/api/messages","appId": "","appPassword": "","id": "1"}],"padlock": "","version": "2.0"}We can add the endpoint for various environments here. Let us add a production end point to this using the msbot command line tool. Rename the file to FitBitAssistantBot.bot file and change the value of the name property above to FitBitAssistantBot. Let us add a production endpoint to the bot file now.
Fire up the command prompt as an Administrator.
Navigate to the folder where the FitBitAssistantBot.bot file is. Run following command to add the production endpoint
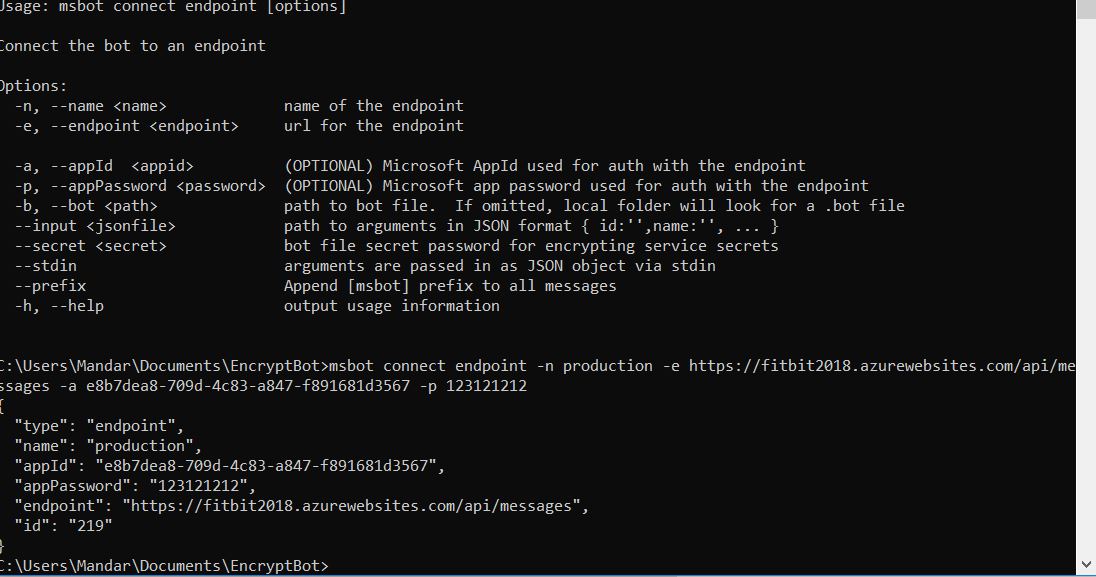
In this way we can add the necessary connection like the connection to the Azure Blob, LUIS QnA maker etc.
But the work is not yet complete. Since we have added the appId and password in the endpoint, we need to encrypt the bot so that the password can not be used by any one as they want.
Following command will encrypt the bot.
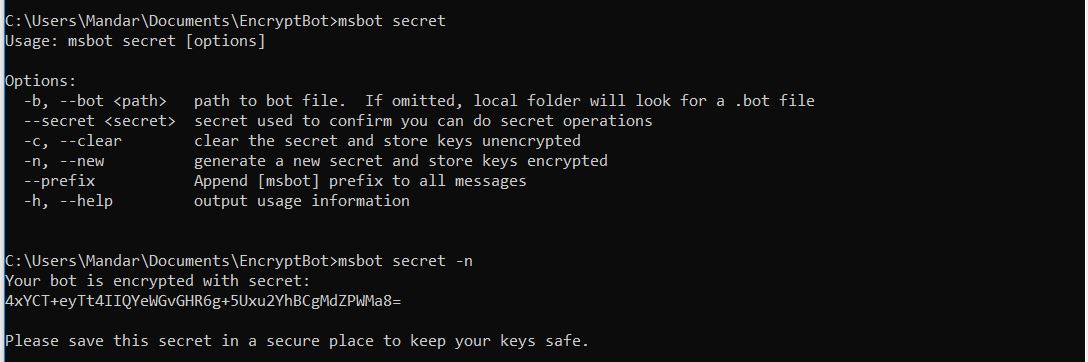
As the message says, we need to save the secret somewhere safe to enable the bot to be able to use the keys added to the .bot file.
When we created the project an appsettings.json file was created, we need to provide the bot file name and the bot secret here to debug the bot locally. The appsettings will look like following.
{ "botFilePath": "FitBitAssistantBot.bot", "botFileSecret": "yourSecretHere"}This is required for the local debugging purpose only, we should not push our botFileSecret value in the source control.
This takes care of the bot encryption. The bot code is now ready to be deployed to the azure portal.
Deploying the Bot Code as Azure App Service using Visual Studio 2017
- Open the project in Visual Studio 2017.
- Right Click the project and select Publish.
- Select the App Service Plan from the list and select publish.
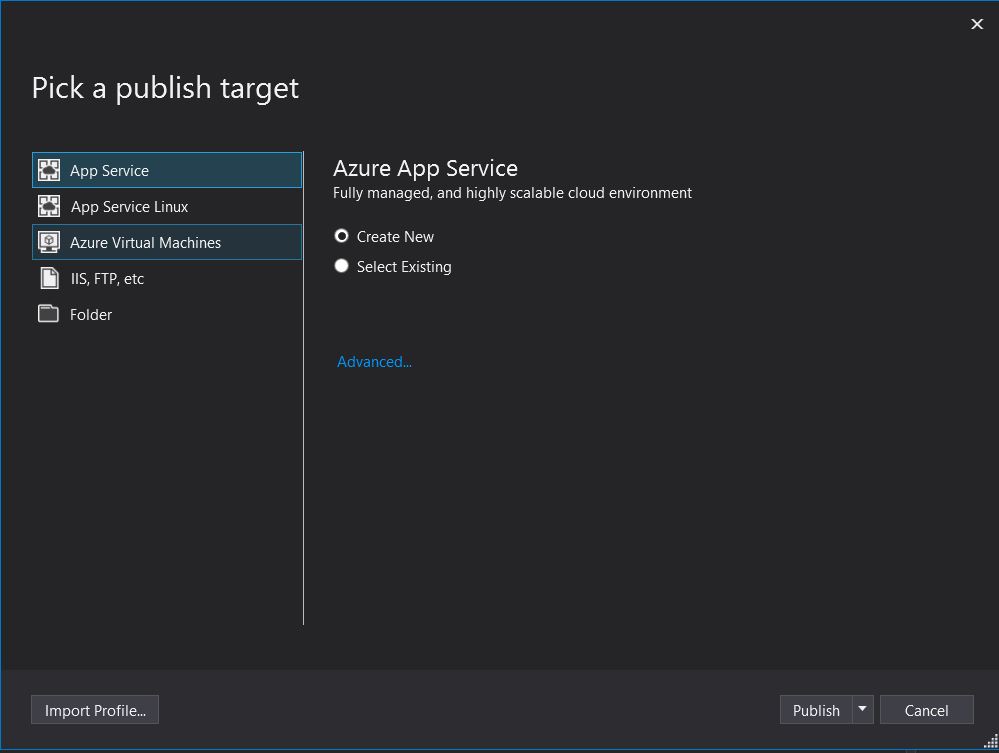
- If you are not connected to Azure, you will be asked to enter your credentials and then provide the details like the AppName, subscription, Resource Group and Hosting Plan.
Note: Provide the AppName as the name we used while creating the production endpoint. e.g if end point used was https://fitbitbot2018.azurewebsites.net/api/messages , the we configure the appName as fitbitbot2018
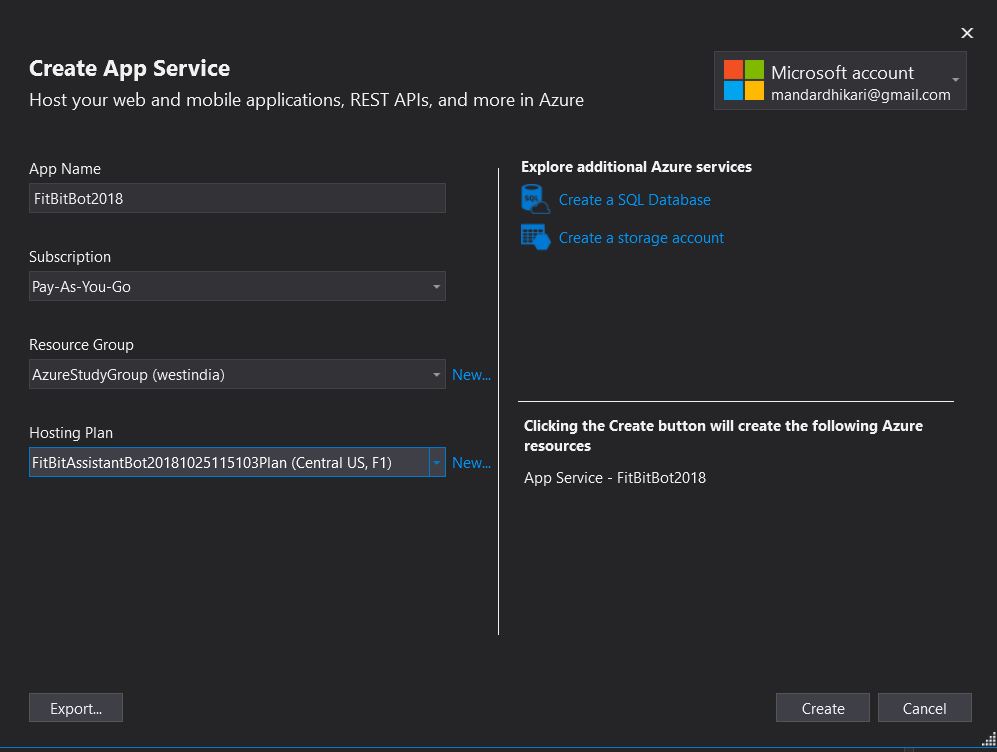
- Once we click on create, it will take some time for the deployment to happen. The Deployment will first create the app service in Azure and then it should automatically start the deployment.
- Once the publishing of the code is completed, the browser will open up the url for the app service. If every thing is done correctly, the url should load up.
- Navigate to the newly deployed Azure App Service and click on the Application Settings
- Add the botFilePath and the botSecretFile keys as shown below. Enter the secret saved earlier.
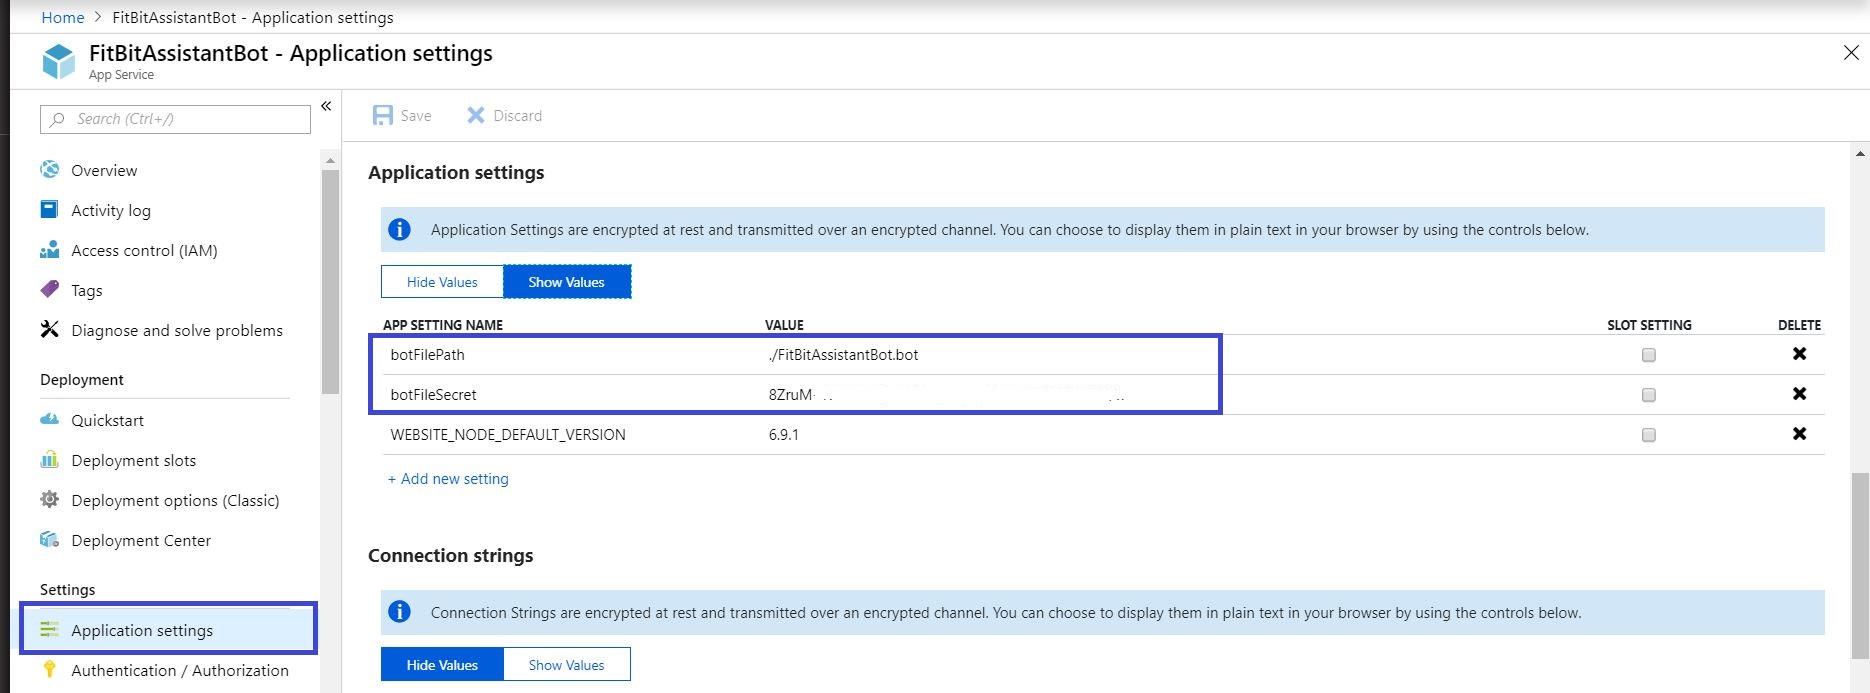
This completes the encryption and deployment of the bot.
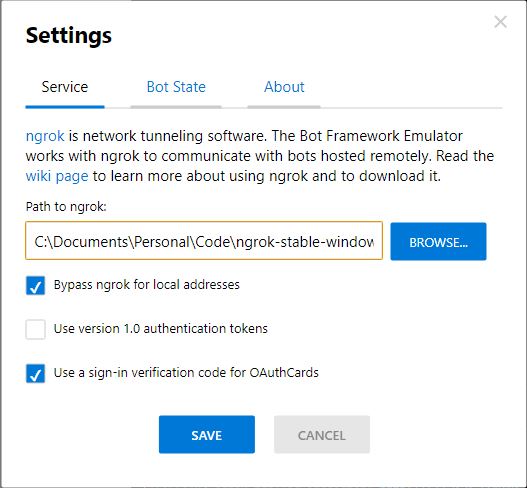
Testing
Let us test the Bot that we created. We will use the Bot Emulator to test the bot and we will use the ngrok tunneling software to test the remotely hosted bot. ngrok can be downloaded from the link provided in the requirements section. Configure the emulator as shown below.
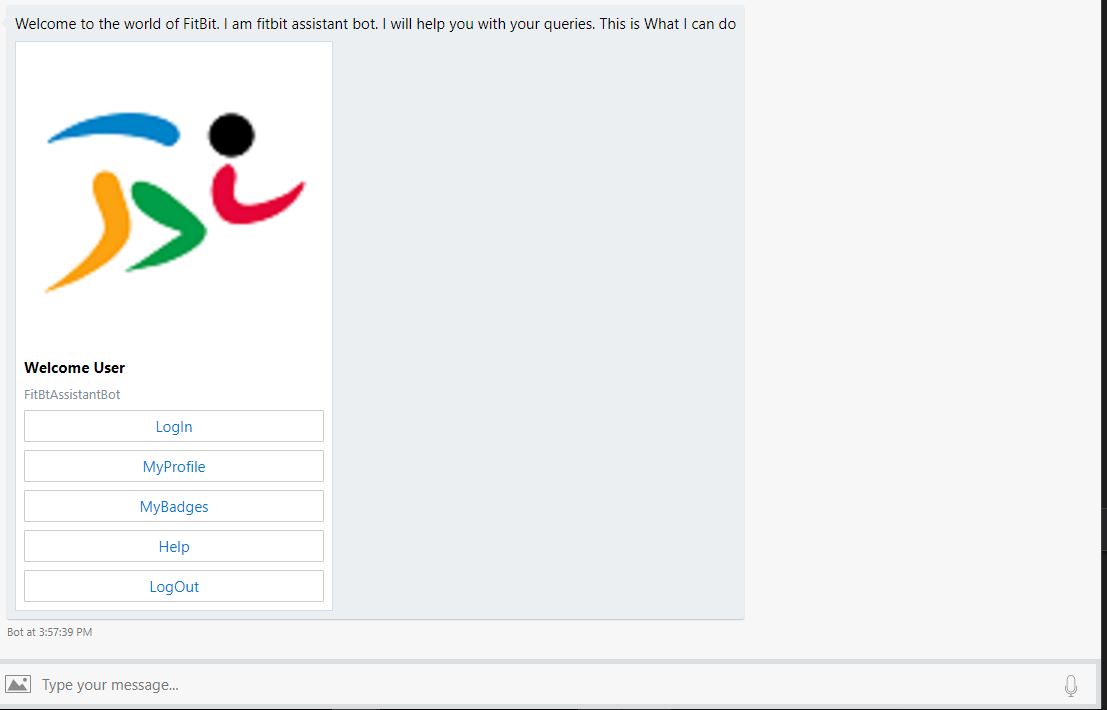
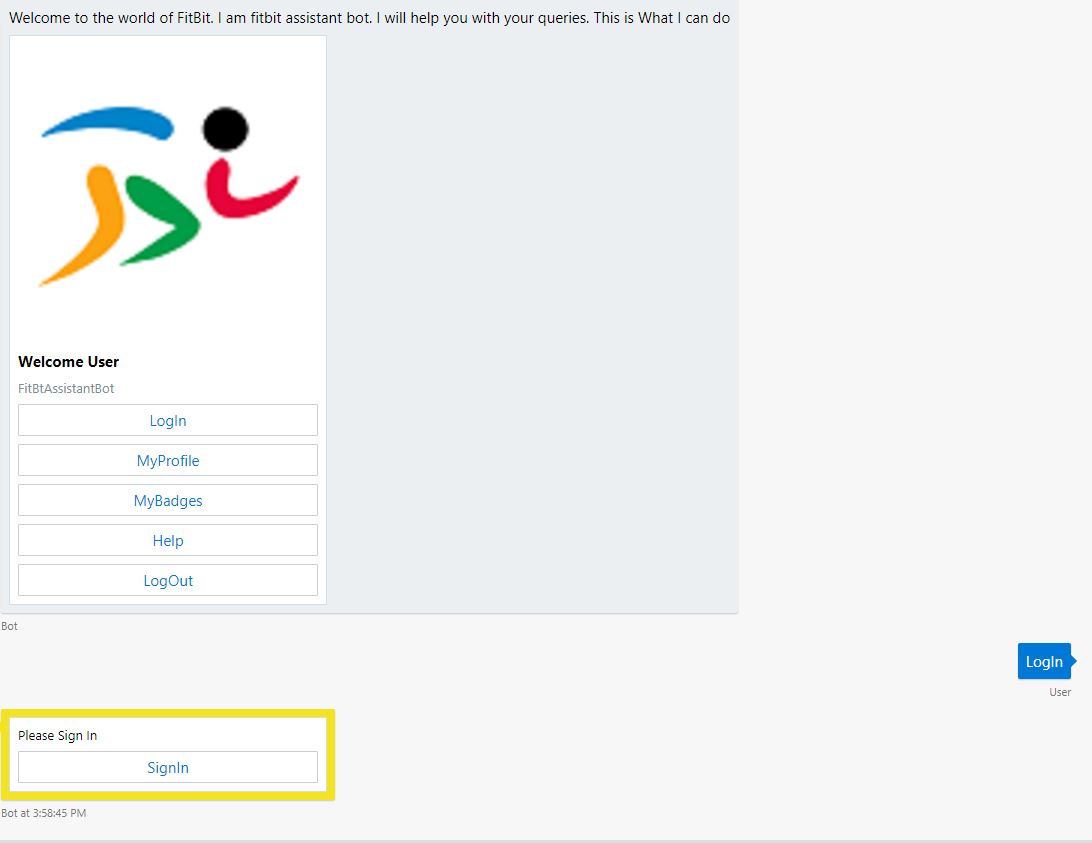
Provide the bot endpoint and the app ID and password and connect to the Bot. We get the welcome card as shown below.
When we click on Login we will be presented with the OAuth Card as shown below
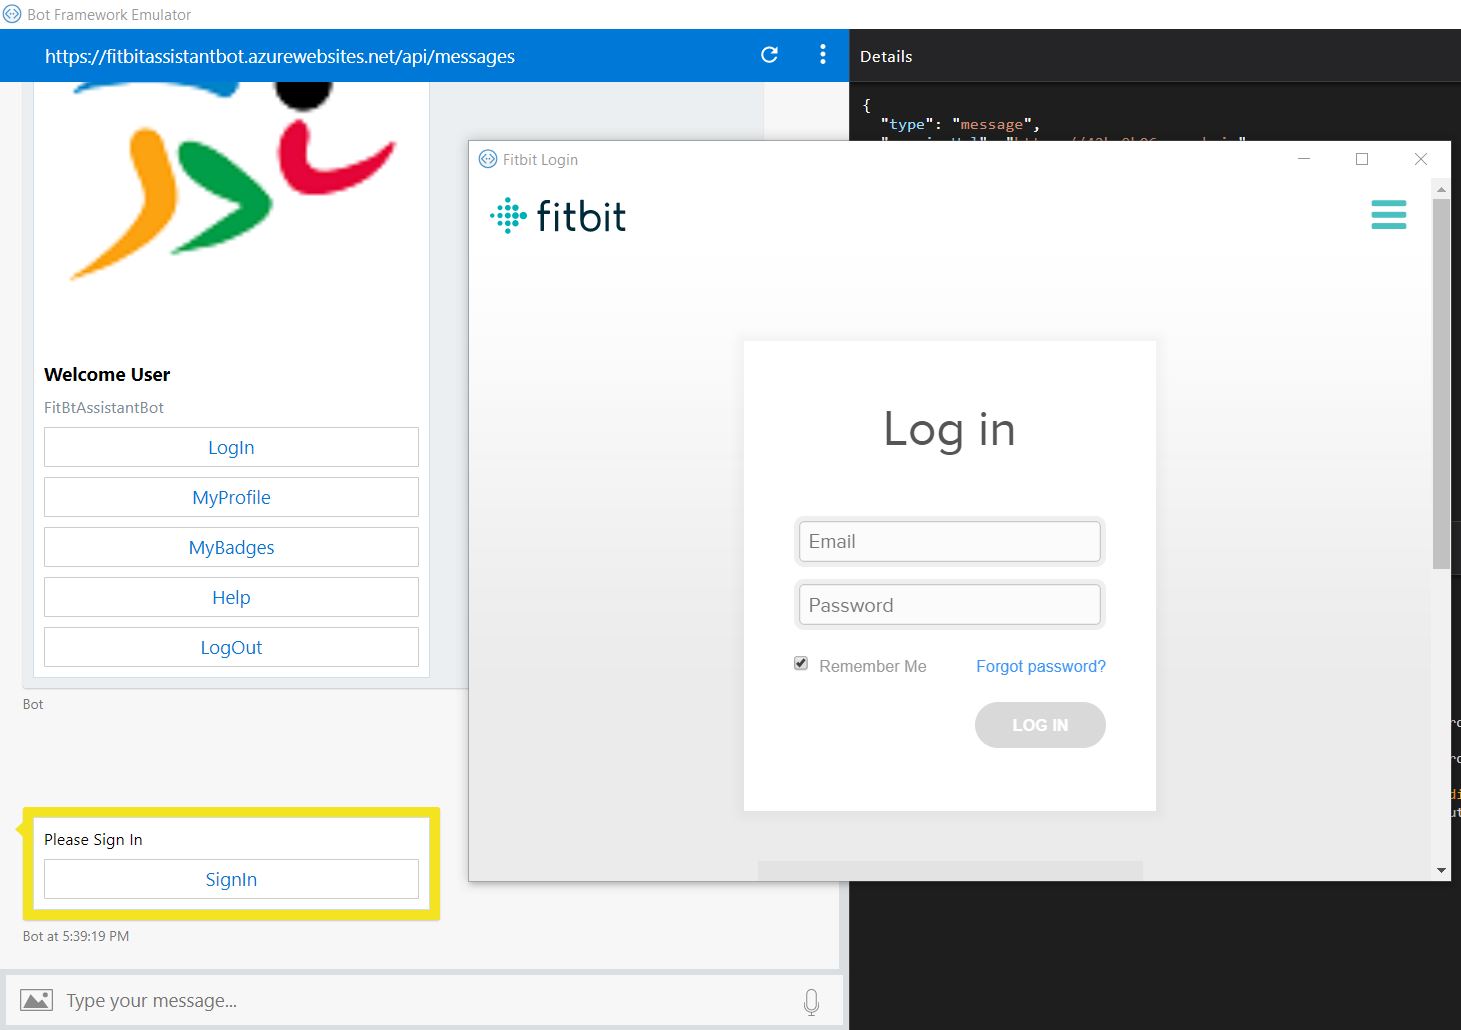
Once we click on the SignIn we will be redirected to the FitBit webpage.
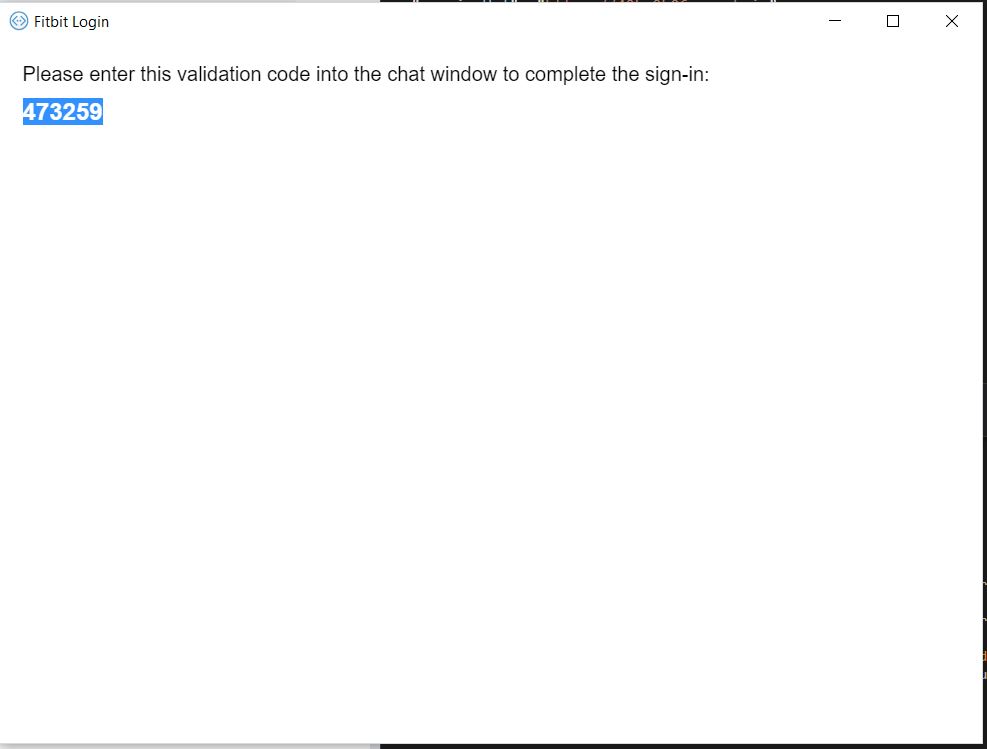
On entering the email id and the password, we will be provided with a magic code. We need to enter it in the chat window to complete the login.
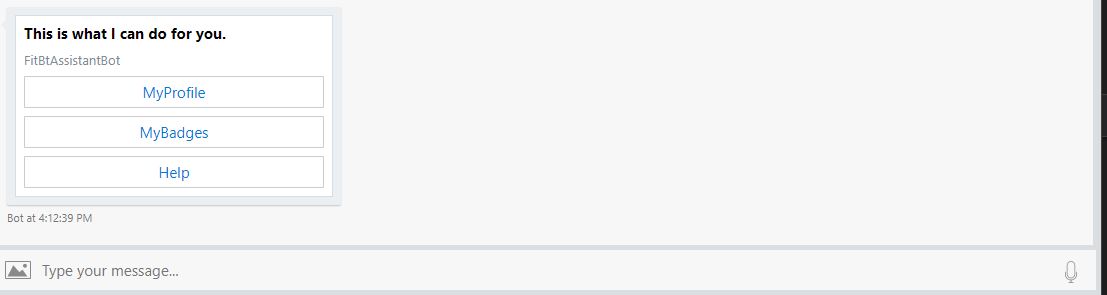
Once we are successfully signed in the Bot shows us the task that it can perform
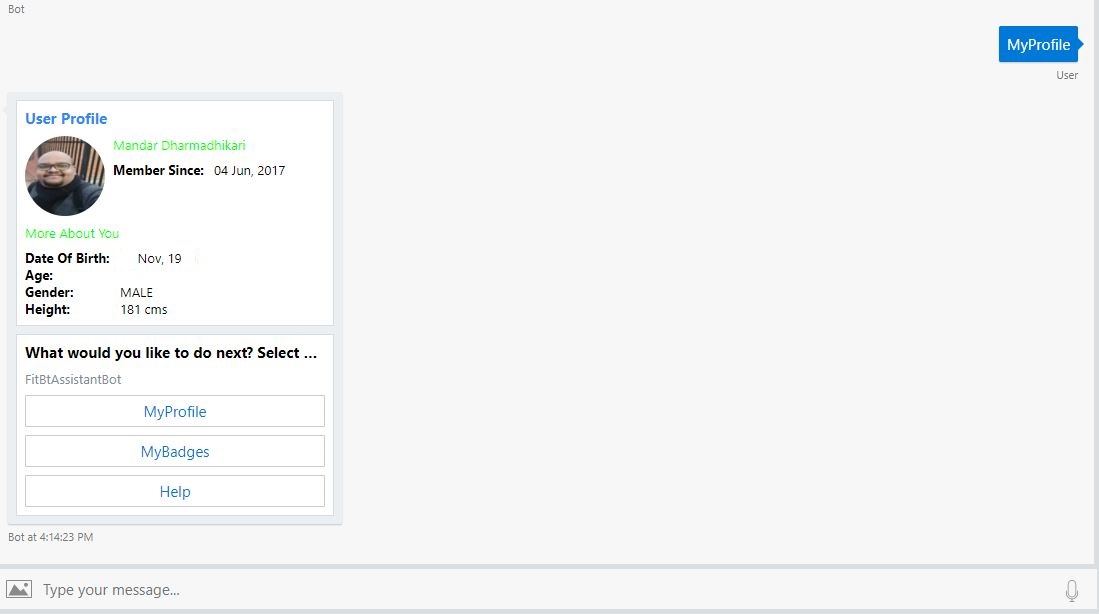
Upon Clicking MyProfile, the bot gets the profile details from the FitBit Web API and sends out an adaptive card.
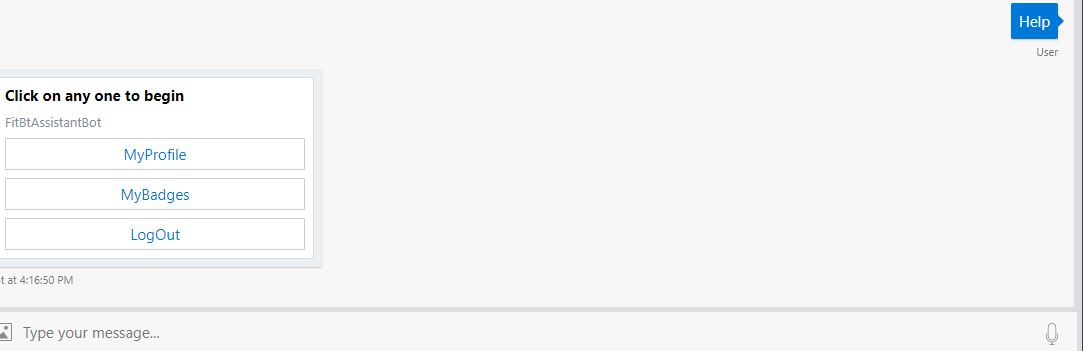
Let us Select, the Bot will send us back the help card that we created.
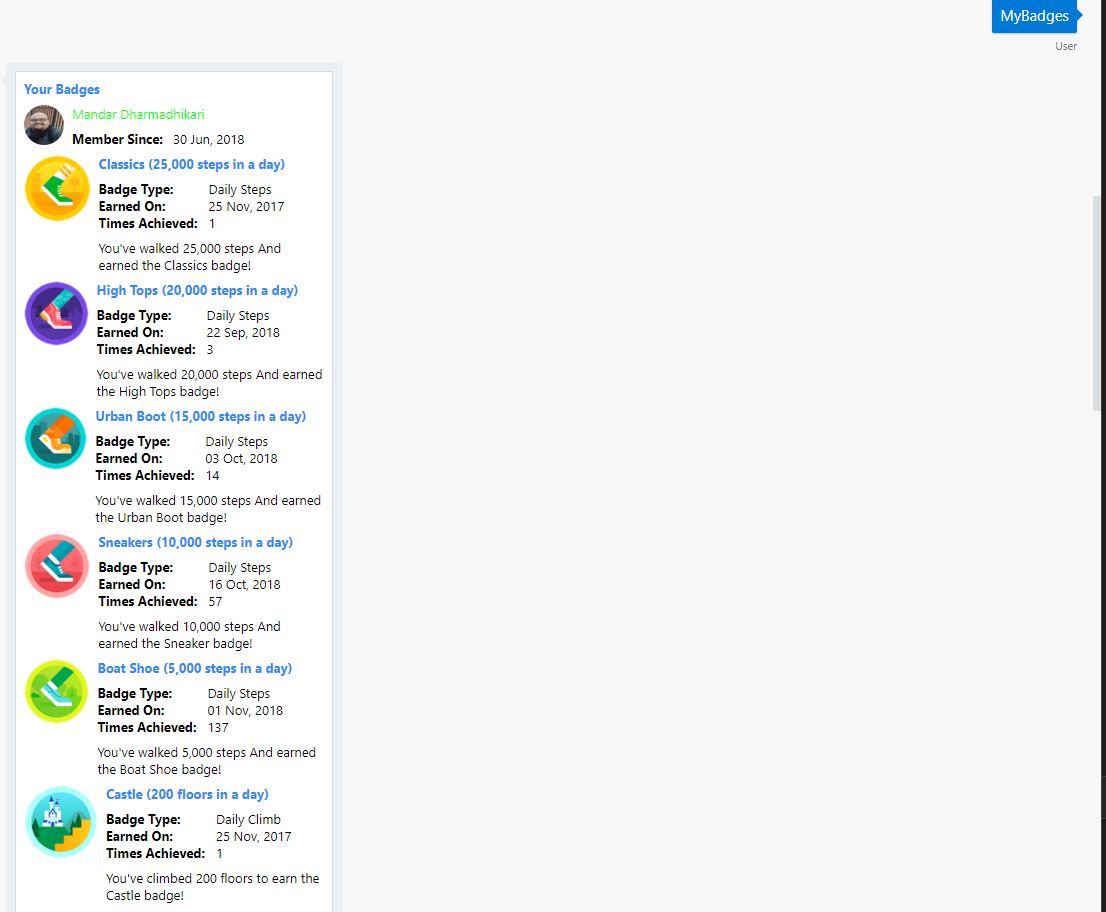
Let us Select the MyBadges option. This will make the bot to query the FitBit Web API for the badges, which will be sent to us as an adaptive card.
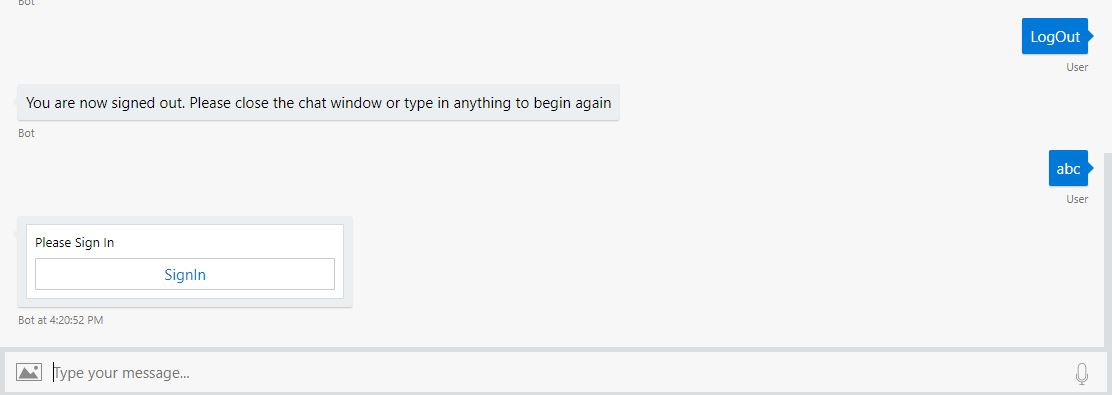
If we click on Log Out we will be logged out of the session by the Bot.
Now if we enter anything again, we will be presented with the sign in card as shown below
Conclusion
In this article we saw how to create a chat bot which can be integrated with the FitBit very easily.
Sample Code for this Bot is available at my GitHub Repository at FitBitAssistantBot